So you know how it goes. You need a new JAR; you fire up your browser of choice, go to the central repository and hunt for the jar that you need. You finally find it after digging through all the folders, then open up pom.xml and add the group id, artifact id, optional version number, etc., and finally, run maven to get the new jar.
Easy huh? ;)
With the m2eclipse plugin, (available at http://m2eclipse.sonatype.org/update/), you no longer have to go through that multi-step process.
If you haven't added the update site before, you'll have to add it manually.
1. Go to Help -> Software Updates -> Find and install
2. Choose the "Search for new features to install" option and click Next
3. Click "New Remote Site..."
4. Enter "m2eclipse" for the name and enter the URL http://m2eclipse.sonatype.org/update/
Now you add dependencies automatically when:
Right clicking on the project and going to Maven -> Add dependency.
and
During coding: code as you normally do, and when Eclipse complains that the class can't be found, you can click on the red "x" and find the dependency by going through the central repository!
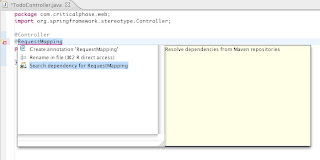
In the example below, I added the @RequestMapping annotation to my Spring 2.5 Controller, and since I didn't have the jar in my local repository, Eclipse notified me of the error. (Figure 1)
Clicking on "Search dependency for RequestMapping" then searched the repository, and provided a listing of potential matching jars. Select the one you want and the rest is automatically taken care of! (Figure 2)

Figure 1: Clicking on the red "x" brings up a context menu where you can search the Maven central repository

Figure 2: The class name is automatically entered, and a list of jars that contain that class is shown.
m2eclipse will take care of downloading the required jars and adding them to your classpath. That's it!
No comments:
Post a Comment